


How Custom Bronze Statues Are Created: Step-by-Step Guide
Commissioning a custom bronze statue is a personal experience. Whether you want to memorialize a loved one, celebrate a milestone, or create a unique piece for your home or garden, the process turns your idea into art. But how does a raw concept become a finished bronze sculpture?
To clarify this journey, let’s walk through each step in creating custom bronze statues, from the initial consultation to every significant phase that brings your vision to life.
Step 1: Initial Consultation
The journey starts with a conversation. You meet with the artist or the foundry to discuss your vision.
- What is the subject?
- What size do you envision?
- Where will the sculpture be placed?
- What style appeals to you?
Bring reference photos, sketches, or even just words that describe the feeling you want to capture.
During this phase, the artist helps you understand what is possible within your budget and timeline. Bronze is a versatile medium, but certain poses or sizes require more work than others. An experienced artist guides you toward choices that will result in a successful piece.
Step 2: Concept Development
Based on your initial discussion, the artist creates preliminary sketches or a small clay maquette (a miniature model of the sculpture). This gives you a concrete sense of the composition and proportions. You may go through several rounds of refinement, adjusting the pose, expression, or details until the concept feels right.
This stage is collaborative. The artist provides technical expertise, but you bring the emotional connection. Together, you shape the vision that will guide the rest of the process.
Step 3: Finalizing the Design
Once the concept is approved, the artist creates detailed drawings or a larger maquette. This procedure ensures that all facets of the sculpture, from anatomical precision to surface texture, are planned out. For larger pieces, this model may be one-third or one-half the final size.
Step 4: Creating the Full-Scale Clay Model
With the design approved, the artist begins work on the full-scale clay model. This is the most labor-intensive part of the creative process. Using armatures, internal support structures, often made of metal or wood, that hold up the clay, the artist builds up the clay, shaping every detail by hand.
For life-sized or larger sculptures, this stage can take months. The artist has to consider not only the piece’s surface appearance but also its physical stability. The clay model will eventually be used to create the mold, so it must be perfect.
Step 5: Molding
Once the clay model is complete, a mold is created around it. For complex sculptures, this may involve multiple pieces. The mold captures every detail of the clay surface. Modern mold-making uses silicone or rubber materials for flexibility, which are then backed by a rigid “mother mold”, an outer shell, usually made of plaster or fiberglass, that preserves the shape of the flexible mold.
Step 6: Wax Casting
Hot wax is poured into the mold and swirled to create a smooth coating. Once cooled, the wax is removed, creating a hollow wax replica of the first sculpture. This wax model is carefully inspected, and any seams or imperfections are smoothed out.
For large sculptures, the wax may be created in sections that will later be assembled.
Step 7: Chasing the Wax
The wax model is refined by a process called “chasing,” which involves adding or enhancing details and smoothing surfaces with heated metal tools. This prepares the wax for casting and is the last chance to make adjustments before pouring the metal.
Step 8: Creating the Sprue System
Wax rods are attached to the wax model. These rods will create channels, called “sprues,” that allow molten bronze to flow into the mold and for air to escape during pouring. The entire assembly looks like a tree with branches.
Step 9: Investing
The wax tree is coated in ceramic slurry, a liquid clay mixture, and then covered with fine sand. This process is repeated multiple times to build up a thick ceramic shell. Once dry, the shell is heated in a kiln (a specialized high-temperature oven). The wax melts and runs out, leaving a hollow ceramic mold. This is why the process is called “lost-wax casting.”
Step 10: Pouring the Bronze
Bronze ingots are melted in a furnace at over 2,000 degrees Fahrenheit. The molten metal is poured into the preheated ceramic mold, filling every cavity where wax once was. The metal cools and solidifies over hours or days, depending on the size.
Step 11: Removing the Mold
Once cool, the ceramic shell is hammered away, revealing the rough bronze casting. The sprues are cut off and saved for future melts.
Step 12: Chasing and Welding
The bronze is cleaned, and any imperfections are chased (ground down) or welded. If the sculpture was cast in sections, they are now welded together seamlessly.
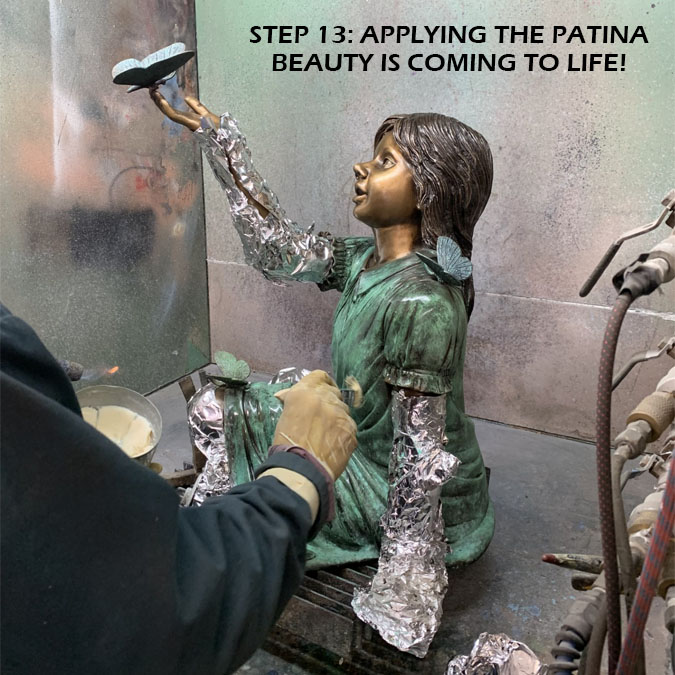
Step 13: Applying Patina
The final surface color, called the patina, is applied using heat and chemicals. Patina refers to the coloration that forms on a bronze’s surface. This stage is both science and art. Different chemicals create different colors: browns, greens, blacks, and even blues. Layers can be built to create depth and richness.
Step 14: Sealing and Mounting
A protective wax or lacquer is applied to preserve the patina. The sculpture is then mounted on its base, ready for installation or delivery.
The Result: A Legacy in Bronze
A custom bronze statue is more than a decoration. It is a legacy, a permanent tribute to someone, or something you love. The process requires effort and cooperation, but the result is a piece that will last for generations.
At Art of Bronze, we work with skilled sculptors and foundries to create custom pieces that go beyond expectations. Contact us to talk about your vision.